This is Part 1 of a series on Cloudflare R2 with Next.js. In this post, we'll cover public file storage with custom domains. Coming up in future parts: presigned URLs for private files, edge functions for optimized delivery, and streaming uploads for large files.
Introduction: Why Cloudflare R2?
Cloudflare R2 is an object storage service that's S3-compatible, meaning you can use familiar AWS SDK patterns without the AWS vendor lock-in. Unlike traditional cloud storage, R2 has no egress fees - you only pay for storage and operations.
What Inspired This Post
I was working on a verification site that needed to handle more than 12,000 users per camp. I had been using 1GB for image storage, but that wasn't going to cut it anymore. With thousands of user-uploaded images and documents coming in, I needed something that could scale without costing a fortune in bandwidth fees. So I turned to Cloudflare R2 - it solved the storage issue and, best of all, there are no egress fees. Perfect for high-traffic apps like this one.
In this first part, we'll focus on public file storage - files that are accessible via direct URLs. This is perfect for:
- Public user-generated content (profile images, public documents)
- Static assets and media files
- High-traffic applications where bandwidth costs matter
- Applications that need a custom CDN domain
Architecture Flow
Compared to alternatives:
- vs. AWS S3: No egress fees, S3-compatible API
- vs. Supabase Storage: More control, better for high-traffic apps
- vs. Vercel Blob: More storage options, custom domain support
The best part? It works seamlessly with Next.js and you can set it up in about 15 minutes.
Prerequisites
Before we start, make sure you have:
- A Cloudflare account (free tier works perfectly)
- A Next.js project (or any React framework)
- A domain (optional, but recommended for custom subdomain)
- Basic understanding of environment variables and server-side code
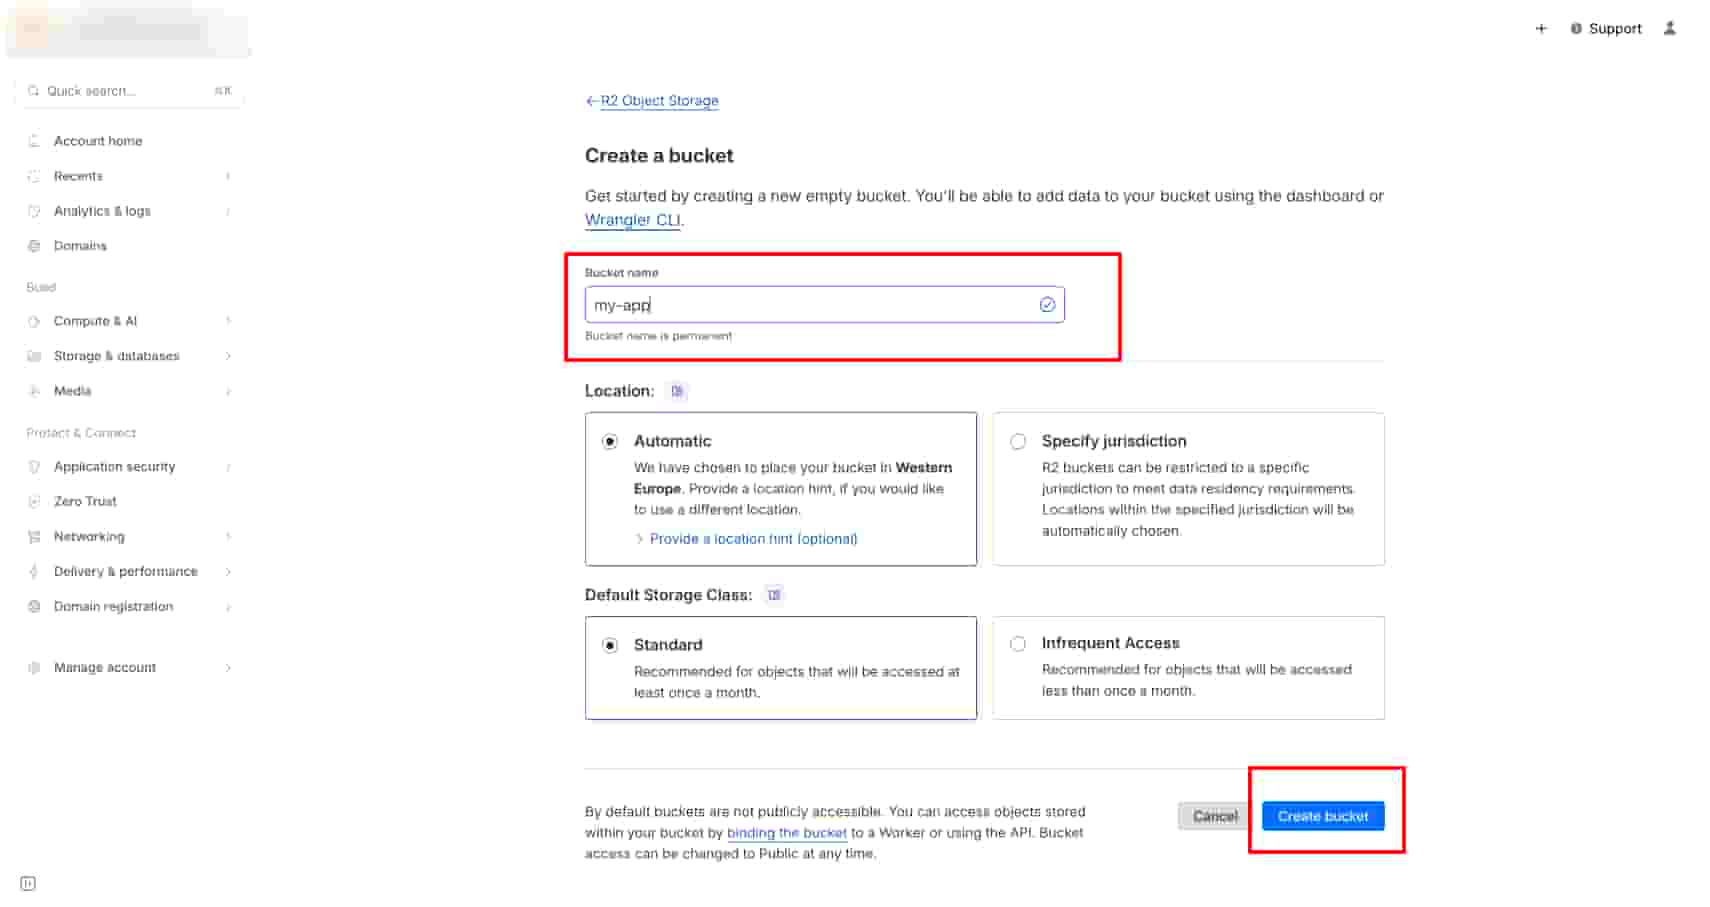
Step 1: Create R2 Bucket
First, let's create your R2 bucket in the Cloudflare dashboard.
- Log in to your Cloudflare Dashboard
- Navigate to R2 in the left sidebar
- Click Create bucket
- Enter a bucket name (e.g.,
my-app-storage) - Choose a location (or leave as default)
- Click Create bucket

Note the bucket name - you'll need it for your environment variables.
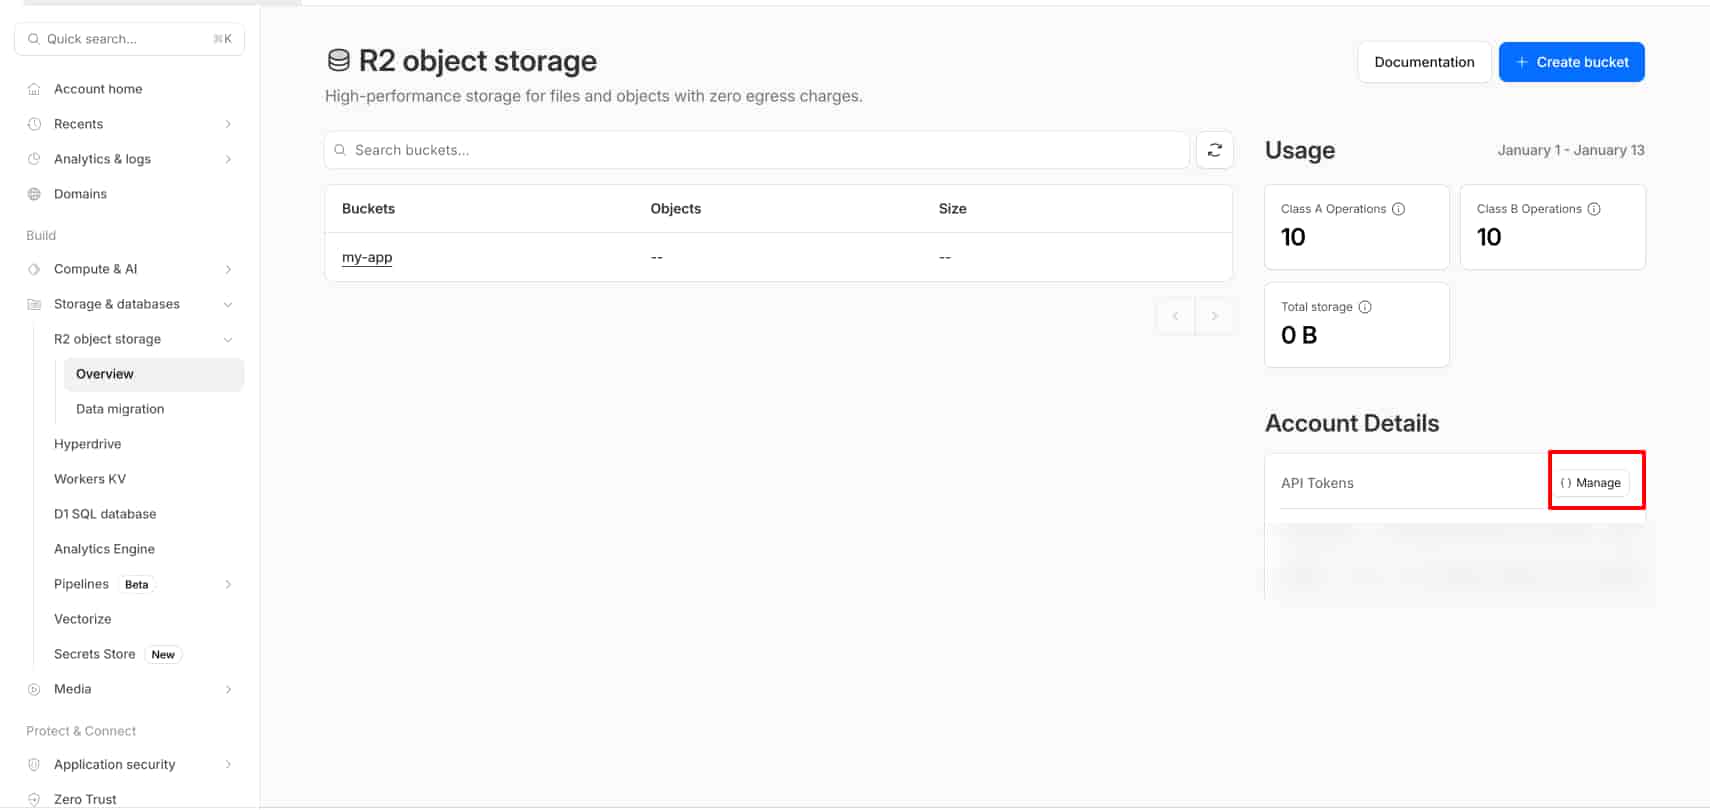
Step 2: Generate API Tokens
To access R2 from your application, you need API credentials.
- In the R2 dashboard, click Manage R2 API Tokens
- Click Create API Token
- Give it a name (e.g., "My App R2 Access")
- Set permissions to Object Read & Write (or Admin for full access)
- Click Create API Token
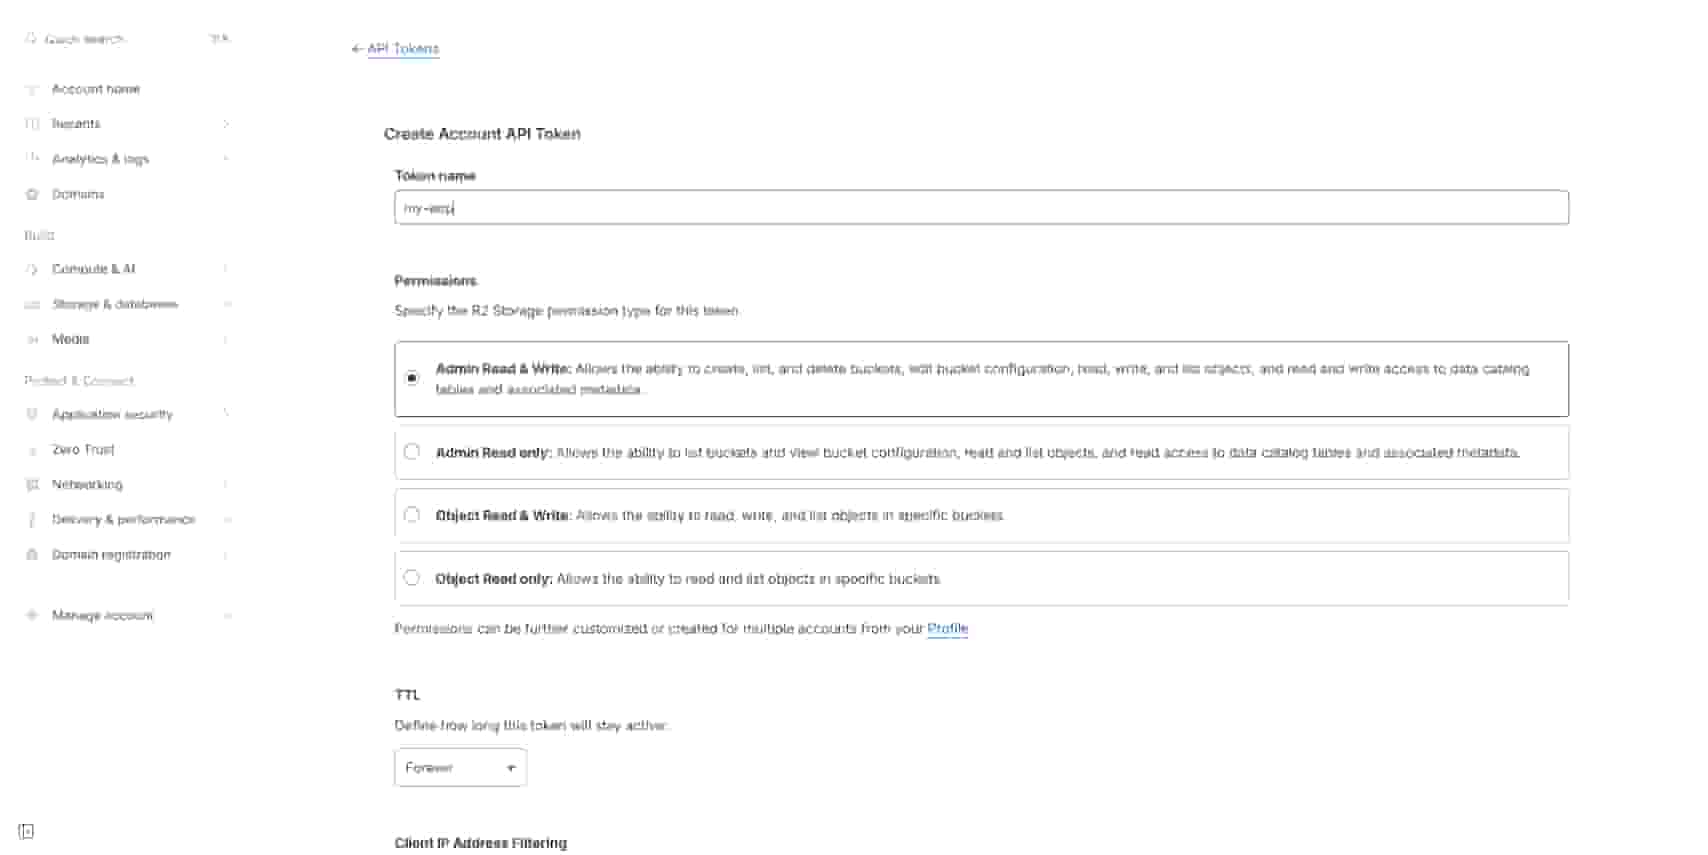
Important: You'll see three values - save them immediately:
- Account ID (looks like:
abc123def456...) - Access Key ID (looks like:
abc123def456...) - Secret Access Key (looks like:
xyz789...- only shown once!)
⚠️ Security: Never commit these tokens to git. Always use environment variables.
Step 3: Point a Subdomain to Your R2 Bucket (Optional but Recommended)
One of R2's best features is the ability to point a custom subdomain directly to your bucket. This gives you:
- Better branding (e.g.,
cdn.yourdomain.cominstead ofpub-xxxxx.r2.dev) - Cloudflare CDN benefits (faster global delivery)
- Custom SSL certificates
- Better SEO and user trust
Important: You must use a subdomain (e.g., cdn.yourdomain.com), not your root domain (yourdomain.com). Using the root domain can cause conflicts with your main website, API routes, or other services.
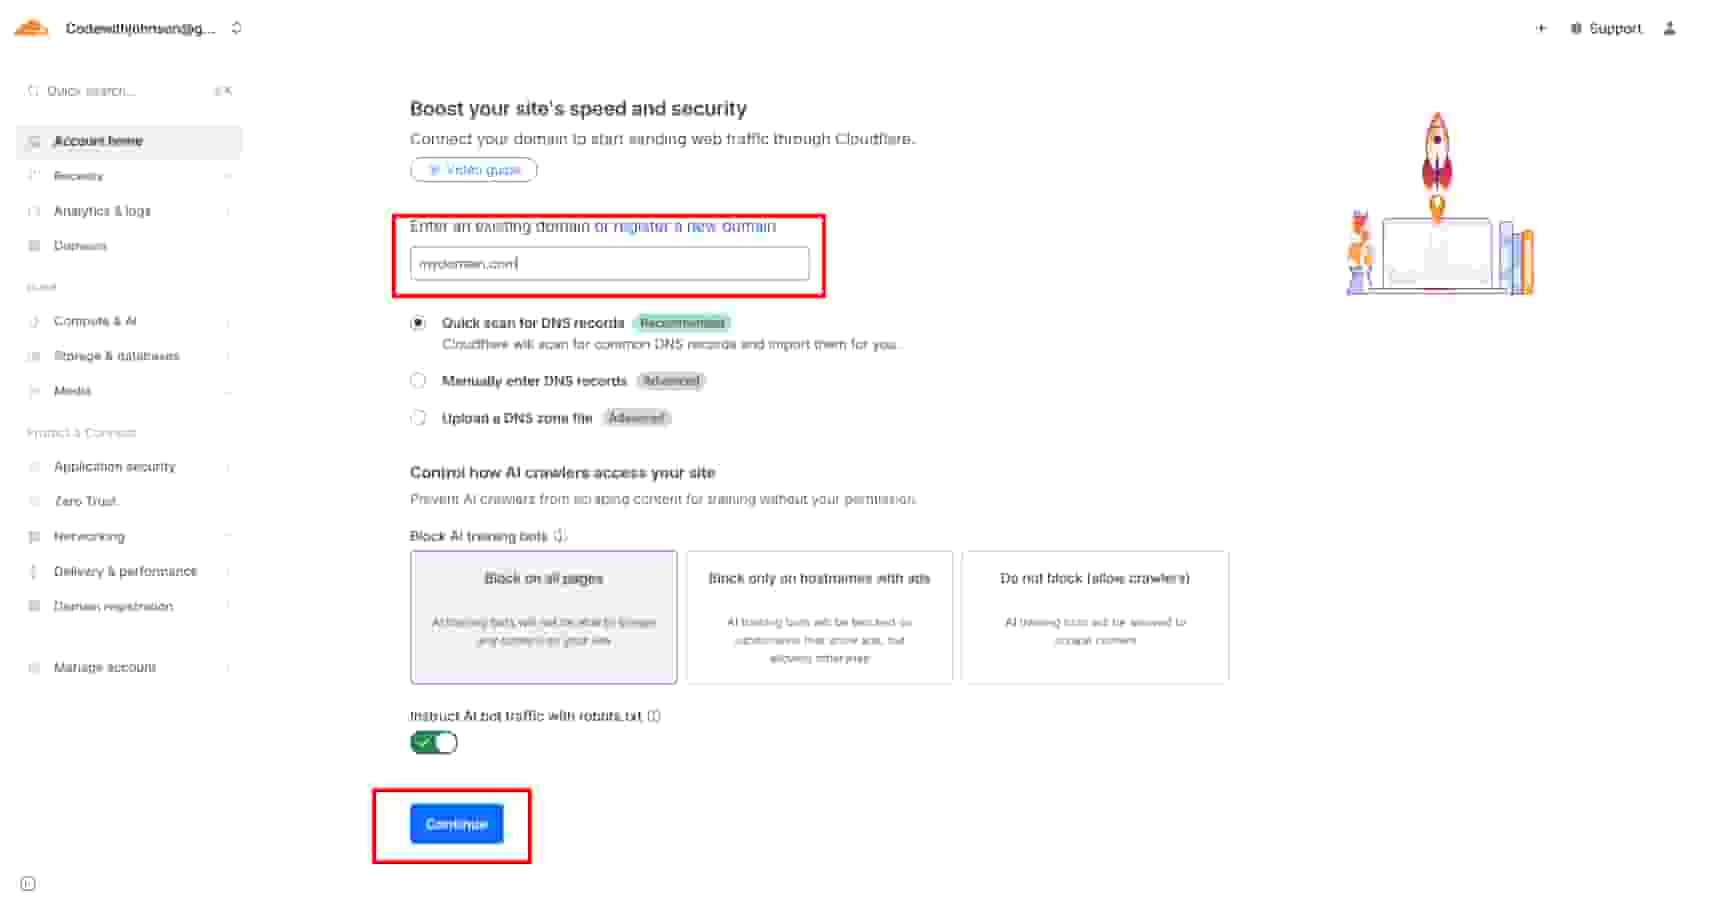
Prerequisite: Add Your Domain to Cloudflare
Why this is required: Cloudflare's services, like DNS management and proxying, rely on you controlling the parent domain's nameservers. To use a custom subdomain for R2, you must first add your entire domain to Cloudflare.
What this means: When you add your domain to Cloudflare, you'll need to:
- Update your domain's nameservers at your registrar to point to Cloudflare
- This gives Cloudflare control over all DNS records for your domain
- You can still use your domain for other services (like hosting on Vercel), but DNS is managed by Cloudflare
How to Point Your Subdomain to R2
-
Add your domain to Cloudflare (required first step)
- Go to Cloudflare Dashboard. Click on domains in the left sidebar and click on onboard a domain
- Enter your domain (e.g.,
yourdomain.com) - Follow the setup wizard
- Cloudflare will provide you with two nameservers (e.g.,
alice.ns.cloudflare.comandbob.ns.cloudflare.com) - Update your domain's nameservers at your registrar (where you bought the domain)
- Wait for DNS propagation (usually 5-30 minutes)
-
Get your R2 endpoint:
- In R2 dashboard, go to your bucket on → Settings → Public Access
- You'll see an endpoint like
e3457d4p1b6828f5120ydea845k4782a.r2.cloudflarestorage.com - Copy this endpoint - you'll need it for the CNAME record
- Note: If you see something like
/app-nameafter the endpoint in the dashboard, ignore it. The endpoint URL should be just the base domain (e.g.,e3457d4p1b6828f5120ydea845k4782a.r2.cloudflarestorage.com). The bucket name is handled separately in your code, not as part of the endpoint URL.
-
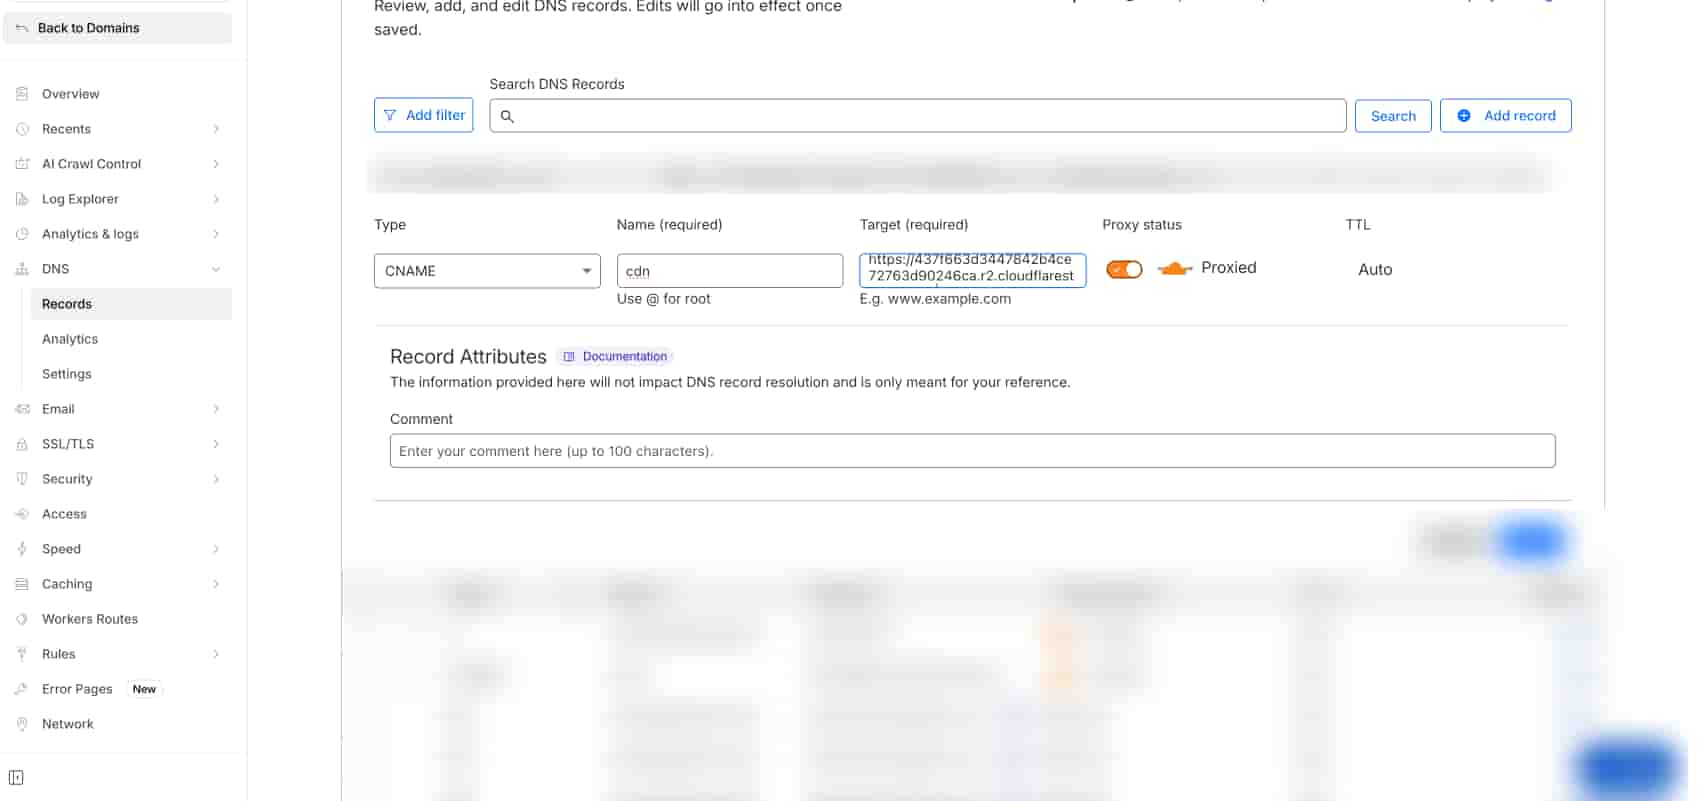
Create CNAME record in Cloudflare DNS:
- Go to Cloudflare Dashboard → Your domain → DNS
- Click Add record
- Type: CNAME
- Name:
cdn(this createscdn.yourdomain.com) - Target:
e3457d4p1b6828f5120ydea845k4782a.r2.cloudflarestorage.com(your R2 endpoint from step 2) - Proxy status: Proxied (orange cloud icon) - this enables Cloudflare CDN
- Click Save
-
Connect domain in R2 Dashboard:
- Go back to R2 Dashboard → Your bucket → Settings → Public Access
- Click Connect Domain
- Enter your subdomain:
cdn.yourdomain.com - Follow the verification steps
-
Verify the connection:
- Wait a few minutes for DNS propagation
- Test by accessing a file:
https://cdn.yourdomain.com/your-file.jpg - If it works, your subdomain is now pointing directly to your R2 bucket!
Why a subdomain? Using a subdomain like cdn.yourdomain.com keeps your R2 assets separate from your main domain, avoiding conflicts with:
- Your main website routes
- API endpoints
- Other services using the root domain
Important Trade-off: If you're hosting on Vercel and want to use a custom R2 domain, you'll need Cloudflare nameservers. This means:
- ✅ You get Cloudflare's CDN and DDoS protection
- ✅ Custom domain for your assets
- ✅ Automatic SSL certificates
- ❌ You lose some Vercel-specific DNS features
Alternative: If you're not ready to switch nameservers, you can use R2's default public URL (e.g., https://pub-xxxxx.r2.dev). You'll still get CDN benefits, just without the custom domain.
Step 4: Install Dependencies
R2 uses the S3-compatible API, so we'll use the AWS SDK v3:
npm install @aws-sdk/client-s3
# or
pnpm add @aws-sdk/client-s3
Step 5: Environment Variables
Create a .env.local file in your Next.js project root with these variables:
# R2 Configuration
R2_ACCOUNT_ID=your_account_id_here
R2_ACCESS_KEY_ID=your_access_key_id_here
R2_SECRET_ACCESS_KEY=your_secret_access_key_here
R2_BUCKET_NAME=my-app-storage
R2_S3_URL=https://your_account_id.r2.cloudflarestorage.com
R2_PUBLIC_URL=https://cdn.yourdomain.com
Explanation:
R2_ACCOUNT_ID: Your Cloudflare account IDR2_ACCESS_KEY_ID&R2_SECRET_ACCESS_KEY: From Step 2R2_BUCKET_NAME: The bucket name from Step 1R2_S3_URL: Your R2 S3 endpoint (format:https://<account-id>.r2.cloudflarestorage.com)R2_PUBLIC_URL: Your custom domain (or R2's default public URL)
Step 6: Create R2 Storage Utility
Now let's create a simple utility file for R2 operations. Create lib/r2-storage.ts:
"use server";

import {
  S3Client,
  PutObjectCommand,
  DeleteObjectCommand,
  GetObjectCommand,
} from "@aws-sdk/client-s3";

// Get R2 configuration from environment
const R2_ACCOUNT_ID = process.env.R2_ACCOUNT_ID;
const R2_ACCESS_KEY_ID = process.env.R2_ACCESS_KEY_ID;
const R2_SECRET_ACCESS_KEY = process.env.R2_SECRET_ACCESS_KEY;
const R2_BUCKET_NAME = process.env.R2_BUCKET_NAME;
const R2_S3_URL = process.env.R2_S3_URL;
const R2_PUBLIC_URL = process.env.R2_PUBLIC_URL;

// Initialize S3 client (singleton pattern)
let s3Client: S3Client | null = null;

function getS3Client(): S3Client {
  if (s3Client) {
    return s3Client;
  }

  if (
    !R2_ACCOUNT_ID ||
    !R2_ACCESS_KEY_ID ||
    !R2_SECRET_ACCESS_KEY ||
    !R2_S3_URL
  ) {
    throw new Error(
      "R2 configuration missing. Check your environment variables."
    );
  }

  // Ensure endpoint doesn't have trailing slash
  const endpoint = R2_S3_URL.endsWith("/") ? R2_S3_URL.slice(0, -1) : R2_S3_URL;

  // R2 requires path-style addressing
  s3Client = new S3Client({
    region: "auto",
    endpoint: endpoint,
    credentials: {
      accessKeyId: R2_ACCESS_KEY_ID,
      secretAccessKey: R2_SECRET_ACCESS_KEY,
    },
    forcePathStyle: true, // Required for R2 (different from standard S3)
  });

  return s3Client;
}

/**
 * Upload a file to R2
 */
export async function uploadToR2(
  file: File,
  fileName: string
): Promise<{ success: boolean; error?: string }> {
  try {
    const client = getS3Client();

    // Convert File to Buffer
    const arrayBuffer = await file.arrayBuffer();
    const buffer = Buffer.from(arrayBuffer);

    const command = new PutObjectCommand({
      Bucket: R2_BUCKET_NAME,
      Key: fileName,
      Body: buffer,
      ContentType: file.type || "application/octet-stream",
      CacheControl: "public, max-age=3600", // Cache for 1 hour
    });

    await client.send(command);

    return { success: true };
  } catch (error) {
    return {
      success: false,
      error: error instanceof Error ? error.message : "Upload failed",
    };
  }
}

/**
 * Delete a file from R2
 */
export async function deleteFromR2(
  fileName: string
): Promise<{ success: boolean; error?: string }> {
  try {
    const client = getS3Client();

    const command = new DeleteObjectCommand({
      Bucket: R2_BUCKET_NAME,
      Key: fileName,
    });

    await client.send(command);

    return { success: true };
  } catch (error) {
    return {
      success: false,
      error: error instanceof Error ? error.message : "Delete failed",
    };
  }
}

/**
 * Get the public URL for a file
 */
export function getR2PublicUrl(fileName: string): string {
  if (!R2_PUBLIC_URL) {
    throw new Error("R2_PUBLIC_URL not configured");
  }

  const cleanFileName = fileName.startsWith("/") ? fileName.slice(1) : fileName;
  const baseUrl = R2_PUBLIC_URL.endsWith("/")
    ? R2_PUBLIC_URL.slice(0, -1)
    : R2_PUBLIC_URL;

  return `${baseUrl}/${cleanFileName}`;
}

/**
 * Download a file from R2
 */
export async function downloadFromR2(
  fileName: string
): Promise<{ buffer: Buffer | null; error?: string }> {
  try {
    const client = getS3Client();

    const command = new GetObjectCommand({
      Bucket: R2_BUCKET_NAME,
      Key: fileName,
    });

    const response = await client.send(command);

    if (!response.Body) {
      return { buffer: null, error: "Empty response" };
    }

    const stream = response.Body as any;
    const arrayBuffer = await stream.arrayBuffer();
    const buffer = Buffer.from(arrayBuffer);

    return { buffer };
  } catch (error) {
    return {
      buffer: null,
      error: error instanceof Error ? error.message : "Download failed",
    };
  }
}
That's it! This is a minimal, production-ready implementation. Let's break it down:
- Server-only: The
"use server"directive ensures this only runs on the server - S3-compatible: Uses AWS SDK v3 with R2's S3-compatible API
- forcePathStyle: Required for R2 (different from standard S3)
- Error handling: Returns success/error status for easy handling
Step 7: Configure Next.js Image Component and Cache Headers
If you're using Next.js Image component to display R2 images, you need to whitelist your R2 domain. Update next.config.mjs:
/** @type {import('next').NextConfig} */
const nextConfig = {
  images: {
    remotePatterns: [
      {
        protocol: "https",
        hostname: "cdn.yourdomain.com", // Your custom R2 domain
        pathname: "/**",
      },
      // Or if using R2's default domain:
      {
        protocol: "https",
        hostname: "pub-*.r2.dev", // R2 default public domain
        pathname: "/**",
      },
    ],
  },
};

export default nextConfig;
If you're using Content Security Policy (CSP) headers, also add your R2 domain to img-src:
async headers() {
  return [
    {
      source: '/(.*)',
      headers: [
        {
          key: 'Content-Security-Policy',
          value: "img-src 'self' blob: data: https://cdn.yourdomain.com",
        },
      ],
    },
  ];
}
Step 8: Use in Your Application
Use R2 in your Next.js Server Actions:
"use server";

import { uploadToR2, getR2PublicUrl } from "@/lib/r2-storage";

export async function uploadFile(formData: FormData) {
  const file = formData.get("file") as File;
  if (!file) {
    return { success: false, error: "No file provided" };
  }

  // Generate unique filename
  const fileName = `uploads/${Date.now()}-${file.name}`;

  // Upload to R2
  const result = await uploadToR2(file, fileName);
  if (!result.success) {
    return result;
  }

  return { success: true, url: getR2PublicUrl(fileName) };
}
Security tip: Always validate file types and sizes, and sanitize filenames before uploading.
Common Issues and Solutions
SSL Errors or Connection Issues
If you're getting SSL errors, make sure:
forcePathStyle: trueis set in your S3Client configuration- Your
R2_S3_URLdoesn't have a trailing slash (the code handles this, but double-check your env var) - You're using the correct endpoint format:
https://<account-id>.r2.cloudflarestorage.com - Your endpoint URL is exactly as shown in the Cloudflare dashboard (no extra paths)
"Access Denied" Errors
This usually means:
- Your API token doesn't have the right permissions
- Your bucket name is incorrect
- Your credentials are wrong
Solution: Double-check your environment variables and API token permissions.
Images Not Loading in Next.js Image Component
If images aren't showing:
- Check that your R2 domain is in
remotePatternsinnext.config.mjs - Verify your CSP headers allow the R2 domain
- Make sure the URL format is correct
Solution: Add your R2 domain to both remotePatterns and CSP img-src.
Custom Domain Not Working
If your custom domain isn't working:
- Verify nameservers are pointing to Cloudflare
- Check DNS records are configured correctly in Cloudflare
- Wait a few minutes for DNS propagation
Solution: Ensure your domain's nameservers are Cloudflare's, and DNS records are set up correctly.
File Upload Size Limits
Next.js has default limits for file uploads. For larger files, configure in next.config.mjs:
// next.config.mjs
export default {
  experimental: {
    serverActions: {
      bodySizeLimit: "10mb", // For Server Actions (Next.js 13+)
    },
  },
  // For API routes (older approach):
  api: {
    bodyParser: {
      sizeLimit: "10mb",
    },
  },
};
Important: Always validate file sizes in your code as well, not just in Next.js config. The config limit prevents server overload, but client-side validation provides better UX.
Note: For files >50MB, consider streaming uploads or presigned URLs (covered in future parts).
Migration Notes
If migrating from other storage services, update URL references in your database. R2 uses standard S3-compatible URLs, making migration straightforward.
Quick Checklist
Before you finish, make sure:
- ✅ R2 bucket created
- ✅ API tokens generated and saved securely
- ✅ Custom domain configured (if using)
- ✅ Environment variables set in
.env.local - ✅ R2 storage utility created
- ✅ Next.js config updated for Image component
- ✅ Test upload successful
- ✅ Images displaying correctly
Now you're ready to use Cloudflare R2 with Next.js! The S3-compatible API makes it easy to integrate, and the zero egress fees make it perfect for high-traffic applications.
What's Next in This Series?
This post covered public file storage with custom domains. Here's what's coming in future parts:
- Part 2: Presigned URLs - Learn how to generate temporary, secure URLs for private file access without exposing your bucket publicly
- Part 3: Edge Functions - Optimize file delivery using Cloudflare Workers at the edge for faster global access
- Part 4: Streaming Uploads - Handle large file uploads efficiently with streaming and multipart uploads
Each part builds on the foundation we've established here, so make sure you've got the basics working before moving on!